Skip to content
회로도전자부품
2013.11.06 08:12

아두이노와 1602 LCD 연결

조회 수 15473 추천 수 0 댓글 0
?

단축키

Prev이전 문서

Next다음 문서

크게 작게 위로 아래로 댓글로 가기 인쇄 첨부
?

단축키

Prev이전 문서

Next다음 문서

크게 작게 위로 아래로 댓글로 가기 인쇄 첨부

아두이노와 1602 LCD 연결


http://cafe.naver.com/makezone/75


this is different from the diagram on arduino.cc(just a little bit)


#include <LiquidCrystal.h>

// variables for input pin and control LED
int analogInput = 1;//Vout핀 연결
int LEDpin = 13;//프로그램이 동작하는걸 보여준다.
int prev = LOW;
int refresh = 500;
float vout = 0.0;
float vin = 0.0;
float R1 = 9820.0; // 저항 R1

float R2 = 987.0; //저항 R2!

int value = 0;

LiquidCrystal lcd(12, 11, 5, 4, 3, 2);


void setup()

{
    pinMode(analogInput, INPUT);// 핀모드 선언

    pinMode(LEDpin, OUTPUT);// 핀모드 선언   

   Serial.begin(19200);// 시리얼포트 통신 초기
  
    lcd.begin(16, 2);
    
  
}
void loop(){
     value = analogRead(analogInput);// 1번핀 값을 읽음
     if (value >= 1023) {
     Serial.println("MAX!!");
     delay(refresh);
     return;
}
    else if (value <= 0) {
        Serial.println("MIN!!");
        delay(refresh);
        return;
}
if (prev == LOW)

    {
        prev = HIGH;
    }

else {
        prev = LOW;
       }
digitalWrite(LEDpin, prev);//디지털 포트 13번 핀 깜빡이게
vout = (value * 5.0) / 1024.0; //10비트 분해능이므로 1024로 나눠줌
vin = vout / (R2/(R1+R2));//저항분배법칙 으로 계산
Serial.print(vin); //입력되는 전압값 출력

Serial.println(" volt");
lcd.print(vin);
delay(refresh);
}


// rs on pin 12
// rw on pin 11
// enable on pin 10


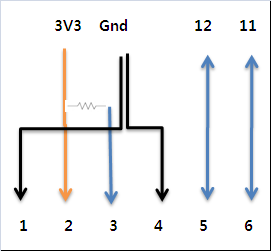
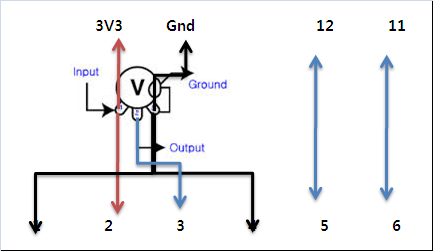
ETC_1.PNG ETC_2.PNG


회로

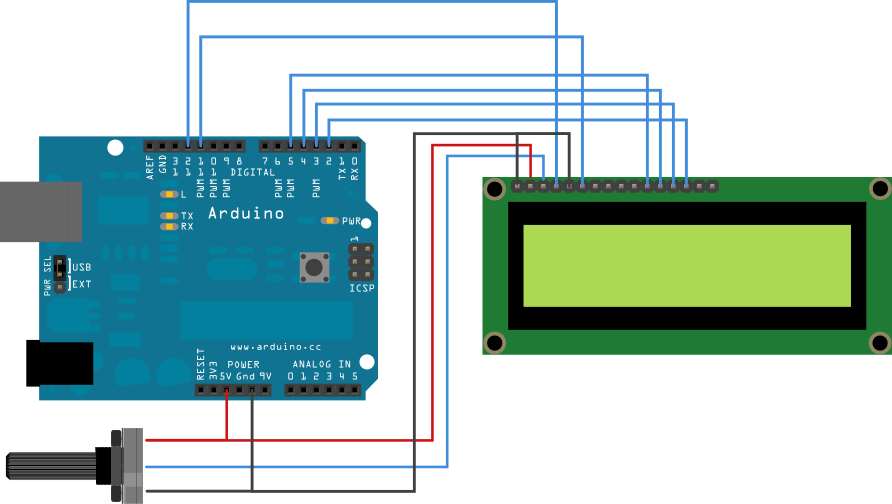
Before wiring the LCD screen to your Arduino we suggest to solder a pin header strip to the 14 (or 16) pin count connector of the LCD screen, as you can see in the image above.
To wire your LCD screen to your Arduino, connect the following pins:

  • LCD RS pin to digital pin 12
  • LCD Enable pin to digital pin 11
  • LCD D4 pin to digital pin 5
  • LCD D5 pin to digital pin 4
  • LCD D6 pin to digital pin 3
  • LCD D7 pin to digital pin 2

Additionally, wire a 10K pot to +5V and GND, with it's wiper (output) to LCD screens VO pin (pin3).

click the images to enlarge


Code Start


/*
  LiquidCrystal Library - Hello World
 
 Demonstrates the use a 16x2 LCD display.  The LiquidCrystal
 library works with all LCD displays that are compatible with the
 Hitachi HD44780 driver. There are many of them out there, and you
 can usually tell them by the 16-pin interface.
 
 This sketch prints "Hello World!" to the LCD
 and shows the time.
 
  The circuit:
 * LCD RS pin to digital pin 12
 * LCD Enable pin to digital pin 11
 * LCD D4 pin to digital pin 5
 * LCD D5 pin to digital pin 4
 * LCD D6 pin to digital pin 3
 * LCD D7 pin to digital pin 2
 * LCD R/W pin to ground
 * 10K resistor:
 * ends to +5V and ground
 * wiper to LCD VO pin (pin 3)
 
 Library originally added 18 Apr 2008
 by David A. Mellis
 library modified 5 Jul 2009
 by Limor Fried (http://www.ladyada.net)
 example added 9 Jul 2009
 by Tom Igoe
 modified 22 Nov 2010
 by Tom Igoe
 
 This example code is in the public domain.

 http://www.arduino.cc/en/Tutorial/LiquidCrystal
 */


// include the library code:
#include <LiquidCrystal.h>

// initialize the library with the numbers of the interface pins
LiquidCrystal lcd(12, 11, 5, 4, 3, 2);

void setup() {
  // set up the LCD's number of columns and rows:
  lcd.begin(16, 2);
  // Print a message to the LCD.
  lcd.print("hello, world!");
}

void loop() {
  // set the cursor to column 0, line 1
  // (note: line 1 is the second row, since counting begins with 0):
  lcd.setCursor(0, 1);
  // print the number of seconds since reset:
  lcd.print(millis()/1000);
}

Code End


See Also:


로그인 후 댓글쓰기가 가능합니다.

?

  1. 08
    Nov 2013
    17:31

    음계와 주파수

    Category회로도전자부품 Views15531
    Read More
  2. 23
    Nov 2013
    15:23

    유도회로 동영상

    Category회로도전자부품 Views11227
    Read More
  3. 03
    Aug 2012
    12:37

    움직이면 쏜다! 아두이노 PIR 모션센싱 버블건

    CategoryAVR Views4997
    Read More
  4. 04
    Dec 2013
    10:43

    왜 이게 머리속에 잘 안들어오지? ㅎㅎㅎ

    Category회로도전자부품 Views18545
    Read More
  5. 14
    Nov 2013
    18:01

    옴의 법칙(Ohm's Law)

    Category회로도전자부품 Views13769
    Read More
  6. 20
    Mar 2014
    08:26

    오디오에서 2way 3way 음분리하기

    Category회로도전자부품 Views3835
    Read More
  7. 25
    Jun 2013
    07:11

    열전도율 높은 금속 순위

    CategoryAVR Views22802
    Read More
  8. 25
    Jun 2013
    07:43

    열전 소자[ thermoelement , 熱電素子 ]

    CategoryAVR Views16715
    Read More
  9. 26
    Oct 2013
    16:15

    역기전력은 왜 입력전압보다 높게 나오는 이유(Volt Boost 원리)

    Category회로도전자부품 Views20130
    Read More
  10. 19
    May 2017
    13:02

    알리익스프레스 전자부품 추가구입 리스트

    Category회로도전자부품 Views3994
    Read More
  11. 17
    Aug 2018
    18:03

    알리익스프레스 부품구입 리스트

    Category회로도전자부품 Views5047
    Read More
  12. 12
    Jun 2015
    13:03

    알리에서 구매한 전자부품

    Category회로도전자부품 Views1100
    Read More
  13. 18
    Nov 2013
    08:28

    안테나 길이 계산법 / 이론

    Category회로도전자부품 Views16773
    Read More
  14. 03
    Aug 2012
    17:45

    안드로이드 스마트폰 + 블루투스 통신 + 아두이노 자동차

    CategoryAVR Views11560
    Read More
  15. 17
    Aug 2012
    17:42

    안드로이드 스마트폰 + 블루투스 + 모터제어

    CategoryAVR Views8310
    Read More
  16. 20
    Jul 2019
    22:46

    아이노트 FS-PB100SQ 보조배터리 퀵차지3.0 보조배터리

    Category회로도전자부품 Views6549
    Read More
  17. 17
    Aug 2012
    15:42

    아스키코드표

    CategoryAVR Views6323
    Read More
  18. 06
    Nov 2013
    08:12

    아두이노와 1602 LCD 연결

    Category회로도전자부품 Views15473
    Read More
  19. 03
    Aug 2012
    11:57

    아두이노에서 써미스터(thermistor)로 온도 측정하기

    CategoryAVR Views6657
    Read More
  20. 03
    Aug 2012
    11:48

    아두이노에서 CDS 입력으로 2개의 PWM 동시제어하기

    CategoryAVR Views5904
    Read More
Board Pagination Prev 1 2 3 4 5 6 ... 13 Next
/ 13

http://urin79.com

우린친구블로그

sketchbook5, 스케치북5

sketchbook5, 스케치북5

나눔글꼴 설치 안내


이 PC에는 나눔글꼴이 설치되어 있지 않습니다.

이 사이트를 나눔글꼴로 보기 위해서는
나눔글꼴을 설치해야 합니다.

설치 취소