
아두이노와 1602 LCD 연결
http://cafe.naver.com/makezone/75
this is different from the diagram on arduino.cc(just a little bit)
|
#include <LiquidCrystal.h> // variables for input pin and control LED float R2 = 987.0; //저항 R2! int value = 0; LiquidCrystal lcd(12, 11, 5, 4, 3, 2);
{ pinMode(LEDpin, OUTPUT);// 핀모드 선언 Serial.begin(19200);// 시리얼포트 통신 초기 { else { Serial.println(" volt"); |
// rs on pin 12
// rw on pin 11
// enable on pin 10
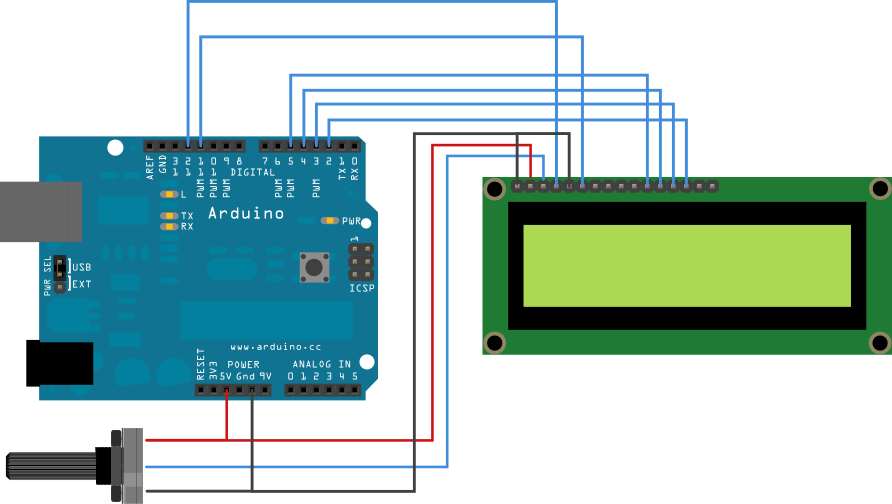
회로
Before wiring the LCD screen to your Arduino we suggest to solder a pin header strip to the 14 (or 16) pin count connector of the LCD screen, as you can see in the image above.
To wire your LCD screen to your Arduino, connect the following pins:
- LCD RS pin to digital pin 12
- LCD Enable pin to digital pin 11
- LCD D4 pin to digital pin 5
- LCD D5 pin to digital pin 4
- LCD D6 pin to digital pin 3
- LCD D7 pin to digital pin 2
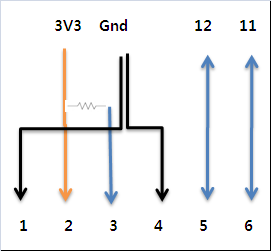
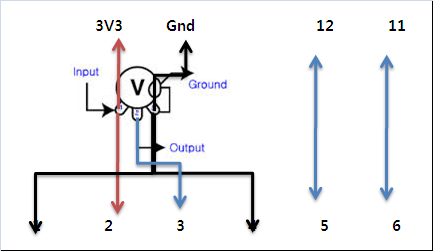
Additionally, wire a 10K pot to +5V and GND, with it's wiper (output) to LCD screens VO pin (pin3).
click the images to enlarge
Code Start
LiquidCrystal Library - Hello World
Demonstrates the use a 16x2 LCD display. The LiquidCrystal
library works with all LCD displays that are compatible with the
Hitachi HD44780 driver. There are many of them out there, and you
can usually tell them by the 16-pin interface.
This sketch prints "Hello World!" to the LCD
and shows the time.
The circuit:
* LCD RS pin to digital pin 12
* LCD Enable pin to digital pin 11
* LCD D4 pin to digital pin 5
* LCD D5 pin to digital pin 4
* LCD D6 pin to digital pin 3
* LCD D7 pin to digital pin 2
* LCD R/W pin to ground
* 10K resistor:
* ends to +5V and ground
* wiper to LCD VO pin (pin 3)
Library originally added 18 Apr 2008
by David A. Mellis
library modified 5 Jul 2009
by Limor Fried (http://www.ladyada.net)
example added 9 Jul 2009
by Tom Igoe
modified 22 Nov 2010
by Tom Igoe
This example code is in the public domain.
http://www.arduino.cc/en/Tutorial/LiquidCrystal
*/
// include the library code:
#include <LiquidCrystal.h>
// initialize the library with the numbers of the interface pins
LiquidCrystal lcd(12, 11, 5, 4, 3, 2);
void setup() {
// set up the LCD's number of columns and rows:
lcd.begin(16, 2);
// Print a message to the LCD.
lcd.print("hello, world!");
}
void loop() {
// set the cursor to column 0, line 1
// (note: line 1 is the second row, since counting begins with 0):
lcd.setCursor(0, 1);
// print the number of seconds since reset:
lcd.print(millis()/1000);
}
Code End
See Also:
lcd.begin()lcd.print()lcd.setCursor()- Liquid Crystal Library
- Blink: control of the block-style cursor.
- Cursor: control of the underscore-style cursor.
- Display: quickly blank the display without losing what's on it.
- TextDirection: control which way text flows from the cursor.
- Scroll: scroll text left and right.
- Serial input: accepts serial input, displays it.
- SetCursor: set the cursor position.
- Autoscroll: shift text right and left.
 스털링엔진(온도차 발전기)