
스프레드시트 autohotkey html gmail 스마트폰 이용하여 핑로스 즉시 알림받기
첫번째
스프레드시트를 설정하겠습니다.
1. 우선 시트1을 하나 만들고,

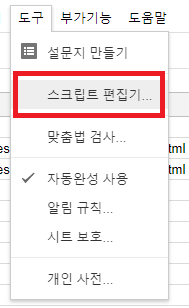
2. 메뉴의 도구 -> 스크립트 편집기를 선택합니다.
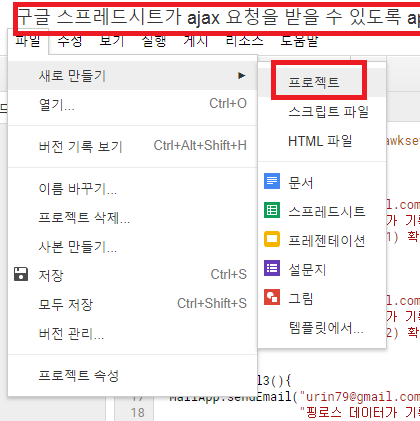
3. 프로젝트 작성합니다.
파일 -> 새로만들기 -> 프로젝트를 선택하고
아래의 소스를 그대로 복사한 뒤
제목을 적고 저장합니다.
-소스-
* 파란색으로 표시한 시트1은 스프레드시트에서 ajax요청을 기록할 시트 이름입니다.
|
// 1. Enter sheet name where data is to be written below var SHEET_NAME = "시트1";
// 2. Run > setup // // 3. Publish > Deploy as web app // - enter Project Version name and click 'Save New Version' // - set security level and enable service (most likely execute as 'me' and access 'anyone, even anonymously) // // 4. Copy the 'Current web app URL' and post this in your form/script action // // 5. Insert column names on your destination sheet matching the parameter names of the data you are passing in (exactly matching case)
var SCRIPT_PROP = PropertiesService.getScriptProperties(); // new property service
// If you don't want to expose either GET or POST methods you can comment out the appropriate function function doGet(e){ return handleResponse(e); }
function doPost(e){ return handleResponse(e); }
function handleResponse(e) { // shortly after my original solution Google announced the LockService[1] // this prevents concurrent access overwritting data // [1] http://googleappsdeveloper.blogspot.co.uk/2011/10/concurrency-and-google-apps-script.html // we want a public lock, one that locks for all invocations var lock = LockService.getPublicLock(); lock.waitLock(30000); // wait 30 seconds before conceding defeat.
try { // next set where we write the data - you could write to multiple/alternate destinations var doc = SpreadsheetApp.openById(SCRIPT_PROP.getProperty("key")); var sheet = doc.getSheetByName(SHEET_NAME);
// we'll assume header is in row 1 but you can override with header_row in GET/POST data var headRow = e.parameter.header_row || 1; var headers = sheet.getRange(1, 1, 1, sheet.getLastColumn()).getValues()[0]; var nextRow = sheet.getLastRow()+1; // get next row var row = []; // loop through the header columns for (i in headers){ if (headers[i] == "Timestamp"){ // special case if you include a 'Timestamp' column row.push(new Date()); } else { // else use header name to get data row.push(e.parameter[headers[i]]); } } // more efficient to set values as [][] array than individually sheet.getRange(nextRow, 1, 1, row.length).setValues([row]); // return json success results return ContentService .createTextOutput(JSON.stringify({"result":"success", "row": nextRow})) .setMimeType(ContentService.MimeType.JSON); } catch(e){ // if error return this return ContentService .createTextOutput(JSON.stringify({"result":"error", "error": e})) .setMimeType(ContentService.MimeType.JSON); } finally { //release lock lock.releaseLock(); } }
function setup() { var doc = SpreadsheetApp.getActiveSpreadsheet(); SCRIPT_PROP.setProperty("key", doc.getId()); } |
이제 위에서 복사해둔 웹 앱 URL을 통해 ajax GET/POST 요청을 보낼 수 있습니다.
ajax명령어를 사용하려면 skin.html에 jQuery스크립트를 포함해야합니다.
예)<script src="https://ajax.googleapis.com/ajax/libs/jquery/2.1.3/jquery.min.js"></script>
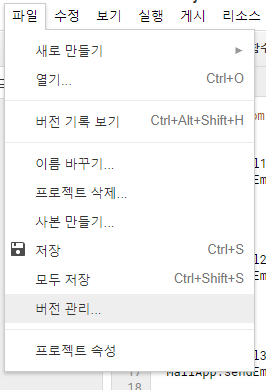
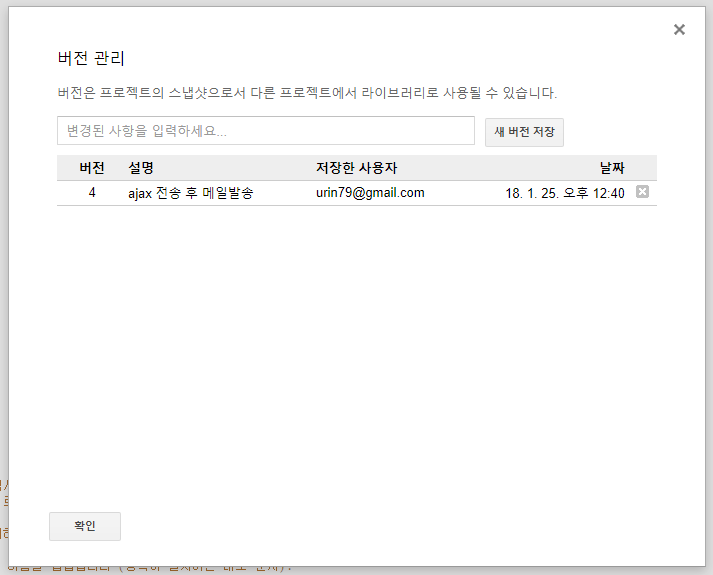
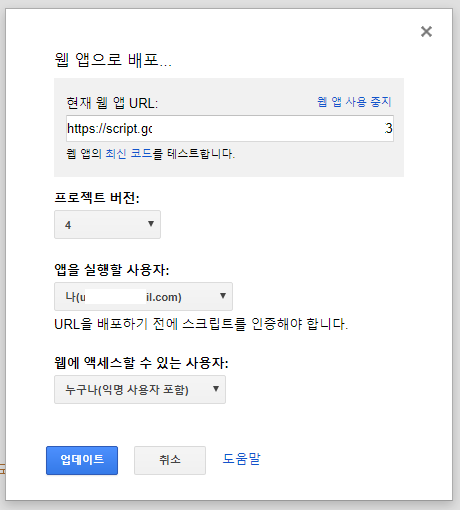
4. 버전을 등록합니다.
반드시 버전을 등록해야하며 만약 스크립트의 바뀐내용을 적용시키려면 게시-웹 앱을 중지한 뒤 버전 삭제 후 다시 등록바랍니다.
그래야 수정된 스크립트대로 적용됩니다.
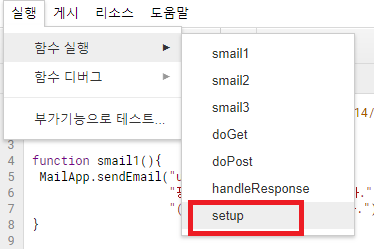
5. 실행 -> 함수실행 -> setup을 실행하고
6. 웹 앱으로 배포를 선택하여 적용합니다.
이것으로 스프레드시트 적용와 스크립트 적용은 끝났습니다.
7. 핑로스시 스프레드시트로 내용을 전달하는 html 문서를 만들어 봅니다.
url은 복사해둔 웹앱 URL을 사용하면 됩니다.
다음은 ajax 예제입니다.
$.ajax({
url: "웹앱URL",
data: {A:"a", B:"b"},
type: "POST"
});
중요 : (스프레드시트에는 미리 첫번째 행에 A가 기록된 열과 B가 기록된 열이 존재해야 a, b가 기록됩니다.)
위의 이미지에 나오는 게시할 수 있는 웹앱URL을 복사후 test.html 파일을 만들때 웹앱URL을 수정합니다.
<!DOCTYPE html>
<html lang="ko">
<head>
<meta charset="utf-8">
<title>Ajax upload example</title>
<script src="https://ajax.googleapis.com/ajax/libs/jquery/2.1.3/jquery.min.js"></script>
<script type="text/javascript">
$.ajax({
url: "웹앱URL",
data: {A:"a", B:"f"},
type: "POST"
});
</script>
여기서 timestamp를 기록하고 싶어서 조금 추가했습니다.
현재는 스프레드시트의 이 양식을 기준으로
var date = new Date();
//var timestamp = date.getTime();
$.ajax({
url: "https://script.google.com/macros/s/매크로주소",
data: {timestamp:date, firstName:"googlespreadsheets/pinglosstime.html", lastName:"전화장애", email:"urin79@gmail.com", address:"121.xx.52.137", notes:"핑로스"},
type: "POST"
});
8. autohotkey로 핑테스트를 한 뒤 문서를 적용해 봅니다.
윈도우 창 정보 알아내기 소스파일 - AHK_Window_Info_v1.7.ahk
include에 필요한 com.ahk 소스파일 - com.ahk
|
#include com.ahk
;http://urin79.com/blog/542292 ;실행파일로 만들때 예를들어 C:\>pingtest.exe 164.124.101.2 이렇게 파라미터 변수를 선택할 수 있습니다. ip=%1%
;ip변수값이 없으면 수동으로 입력한 ip를 대체해서 사용한다는 내용 if !ip { ; ip="10.1.169.1" ip="10.1.180.230" }
loop{
runwait, %comspec% /c "%systemroot%\system32\ping %ip% -n 1 > d:\Ping.txt",, hide ;FileRead, ping, D:\ping.txt
if (ver="Windows 7") or (ver="Windows Vista") { FileReadLine, ping, D:\ping.txt, 3 } else { FileReadLine, ping, D:\ping.txt, 3 }
sleep, 1000 ; msgbox,%ping% pingline=%pinglines%%A_Mon%월 %A_MDay%일 %A_Hour%시 %A_Min%분 %A_Sec%초:::%ping%
FileAppend, %pingline%`n, D:\pingTest.txt
; IfInString, pingline, 만료 ; IfNotInString, pingline, TTL IfInString, ping, 만료 { ; msgbox, %pingline%
pwb := ComObjCreate( "InternetExplorer.Application" ) ; Create an IE object pwb.Visible := True ; Make the IE object visible
; pwb.Navigate( "D:\백업\html\spreadsheets html\spreadsms.html" ) pwb.Navigate( "http://주소/googlespreadsheets/pinglosstime.html" ) While, pwb.Busy ; While, pwb.Busy Continue sleep, 2000 ; msgbox, 와우
IfWinExist, 핑로스 알람 스프레드시트에 데이터 전송 - Internet Explorer WinClose, 핑로스 알람 스프레드시트에 데이터 전송 - Internet Explorer sleep, 10000 } sleep, 5000 }
^R:: reload return
^X:: ExitApp return |
#스프레드시트 #autohotkey #html #gmail #스마트폰 #핑로스 #알림받기