
Robot arm Arduino(로봇 팔 만들기)
참고사이트 : https://www.electronicshub.org/robotic-arm/
- 그림과 같이 플라스틱 조각을 두 기어에 모두 붙입니다. 실제로 물체를 고정시키는 핵심 부품이므로 단단히 붙이십시오.

아두이노 CODE
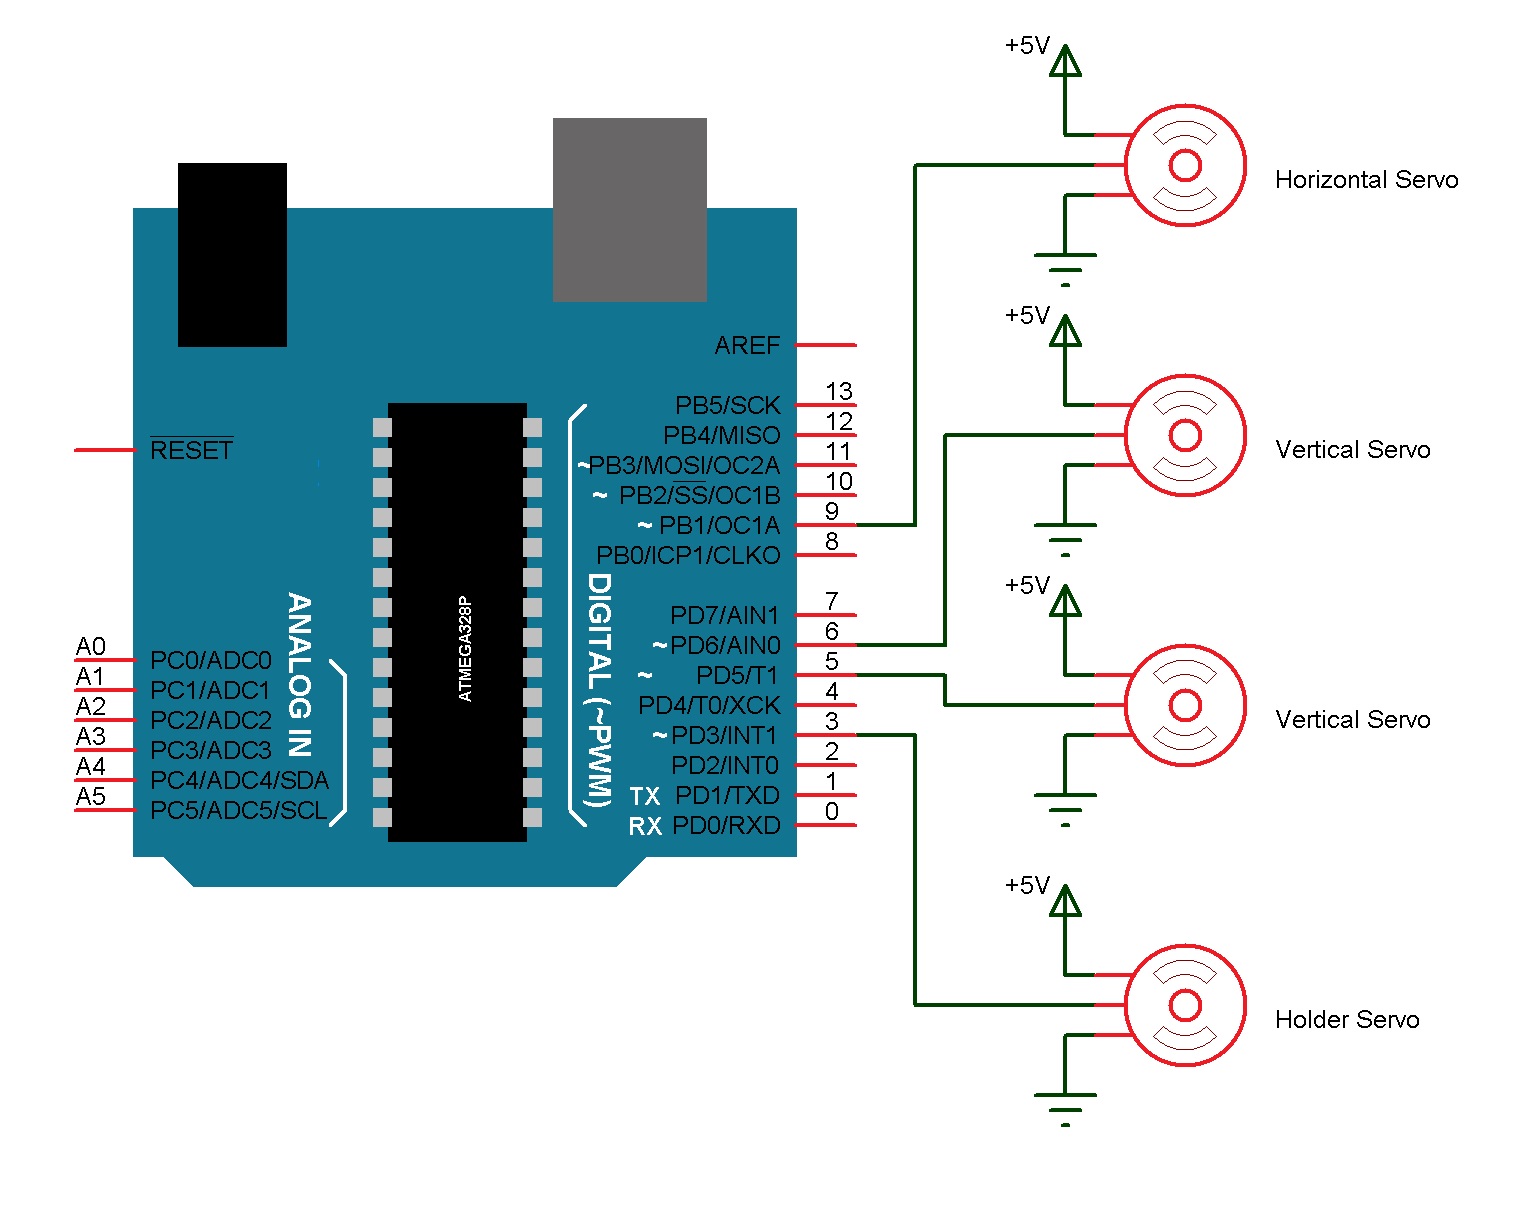
/*NOTE: Four Servos of the Robotic Arm are connected to 4 PWM Pins of Arduino
and these 4 servos are named a, b, c and d.
If you want to control servo a, then type "90a/",
where "90" is the PWM value (range is 0 - 255),
"a" means servo a and "/" is string parse delimiter.
Some other examples: 100a/ or 120b/ or 40c/ or 25d/
*/
String readString;
int x=90, y=90, z=90, p=90;
#include <Servo.h>
Servo myservoa, myservob, myservoc, myservod;
void setup()
{
Serial.begin(9600);
myservoa.attach(3);
myservob.attach(5);
myservoc.attach(6);
myservod.attach(9);
myservoa.write(x);
myservob.write(y);
myservoc.write(z);
myservod.write(p);
}
void loop()
{
if (Serial.available())
{
char m = Serial.read();
if (m == '/')
{
if (readString.length() >1)
{
Serial.println(readString);
int temp = readString.toInt();
Serial.print("writing Angle: ");
Serial.println(temp);
if(readString.indexOf('a') >=0)
{
if (temp>x)
{
for (int i=x; i<temp; i++)
{
myservoa.write(i);
delay(10);
}
x=temp;
}
else
{
for (int i=x; i>temp; i--)
{
myservoa.write(i);
delay(30);
}
}
x=temp;
}
//////////////////////////////////////////////////////////////////////////////
if(readString.indexOf('b') >=0)
{
if (temp>y)
{
for (int i=y; i<temp; i++)
{ myservob.write(i);
delay(10);
}
y=temp;
}
else
{
for (int i=y; i>temp; i--)
{
myservob.write(i);
delay(10);
}
y=temp;
}
}
///////////////////////////////////////////////////////////////////////
if(readString.indexOf('c') >=0) //myservoc.write(n);
{
if (temp>z)
{
for (int i=z; i<temp; i++)
{myservoc.write(i);
delay(10);}
z=temp;
}
else
{
for (int i=z; i>temp; i--)
{
myservoc.write(i);
delay(10);
}
z=temp;
}
}
/////////////////////////////////////////////////////
if(readString.indexOf('d') >=0)
{
if (temp>p)
{
for (int i=p; i<temp; i++)
{
myservod.write(i);
delay(10);
}
p=temp;
}
else
{
for (int i=p; i>temp; i--)
{
myservod.write(i);
delay(30);
}
}
p=temp;
}
readString="";
}
}
else
{
readString += m;
}
}
}
|
ARDUINO - 프로그래밍 가능한 로봇 암 (서보 위치의 기록 및 반복)
//myservo[i].detach(); //서보모터를 일정시간 사용하지 않으면 연결을 끊어둔다.
// 아두이노 4자유도 로봇팔 제어
#include <Servo.h>

#define XPOS 0
#define YPOS 1

const int SERVOS = 4;
int PIN[SERVOS], value[SERVOS], idle[SERVOS], currentAngle[SERVOS], MIN[SERVOS];
int MAX[SERVOS], INITANGLE[SERVOS], previousAngle[SERVOS],ANA[SERVOS];
Servo myservo[SERVOS];

void setup()   {

  //좌우회전 서보모터
  PIN[0] = 9; //서보모터 IO를 9번핀으로 지정
  MIN[0] = 0; //서보모터 최소 회전각도
  MAX[0] = 180; //서보모터 최대 회전각도
  INITANGLE[0] = 90; //서보모터 초기각도
  ANA[0] = 3; //조이스틱스위치입력 IO를 아날로그 A3번핀으로 지정
  //왼쪽 서보모터
  PIN[1] = 6;
  MIN[1] = 30;
  MAX[1] = 165;
  INITANGLE[1] = 152;
  ANA[1] = 2;
  //오른쪽 서보모터
  PIN[2] = 5;
  MIN[2] = 40;
  MAX[2] = 180;
  INITANGLE[2] = 90;
  ANA[2] = 0;
  //그립퍼 서보모터
  PIN[3] = 10;
  MIN[3] = 60;
  MAX[3] = 180;
  INITANGLE[3] = 60;
  ANA[3] = 1;

  for (int i = 0; i < SERVOS; i++){
    myservo[i].attach(PIN[i]);
    myservo[i].write(INITANGLE[i]);
    value[i] = 0;
    idle[i] = 0;
    previousAngle[i]=INITANGLE[i];
  }
}

void loop() {
  delay(20); // 로봇팔 속도조정을 위한 딜레이

    for (int i = 0; i < SERVOS; i++){
      value[i] = analogRead(ANA[i]);
      currentAngle[i] = myservo[i].read();

      if (value[i] > 612) {
        idle[i] = 0;

        if (currentAngle[i] < MAX[i]) ++currentAngle[i];
        if (!myservo[i].attached()){
          myservo[i].attach(PIN[i]);
        }
        myservo[i].write(currentAngle[i]);
      } else if (value[i] < 412) {
      idle[i] = 0;
      if (currentAngle[i] > MIN[i]) --currentAngle[i];
      if (!myservo[i].attached()){
        myservo[i].attach(PIN[i]);
      }
      myservo[i].write(currentAngle[i]);
    } else {
      ++idle[i];
    }
    if (idle[i] > 100){
      myservo[i].detach(); //서보모터를 일정시간 사용하지 않으면 연결을 끊어둔다.
      idle[i] = 0;
    }
  }

}
SIMPLE 3 BUTTON CONTROLLER FOR A 4 AXIS ROBOT ARM

___로봇 팔 4motor 2button 소스__.ino
|
#include <Servo.h>
Servo myservo1; // create servo objects to control 4 servos Servo myservo2; Servo myservo3; Servo myservo4; // move this to its own initialising code file int pos1 = 85; // variable to store the servo's position, set start position to 85 int pos2 = 85; int pos3 = 85; int pos4 = 85; // * int leftPressed = 0; int rightPressed = 0;
const int maxDeg = 173; // variable that limits the maximum range of the servo's movement to 175 const int minDeg = 7; // variable that limits the minimum range of the servo's movement to 5 const int movement = 2; // variable which sets the default distance to move the servo
const int switchPin = 2; // the button that controls the servo selection is connected to pin 2 const int leftButton = 3; // the buttons that control the left and right movement of the servo const int rightButton = 4;
const int servoOutput1 = 9; // tells the Arduino the location of the signal cable to the servo const int servoOutput2 = 10; const int servoOutput3 = 11; const int servoOutput4 = 12;
byte ledPin1 = 5; // led on pin 9 byte ledPin2 = 6; // led on pin 10 byte ledPin3 = 7; // led on pin 11 byte ledPin4 = 8; // led on pin 12
byte buttonPresses = 0; // how many times the button has been pressed byte lastPressCount = 0; // to keep track of last press count
void setup() {
pinMode(ledPin1, OUTPUT); // set the digital pins to the LEDs as outputs pinMode(ledPin2, OUTPUT); pinMode(ledPin3, OUTPUT); pinMode(ledPin4, OUTPUT);
pinMode(switchPin, INPUT); // set the servo select button as an input
pinMode(servoOutput1, OUTPUT); // set the pins connected to the servos as outputs pinMode(servoOutput2, OUTPUT); pinMode(servoOutput3, OUTPUT); pinMode(servoOutput4, OUTPUT);
pinMode(leftButton, INPUT); // set the left and right control buttons as inputs pinMode(rightButton, INPUT);
myservo1.attach(servoOutput1); // attaches the servo's signal cable location to the servo object myservo2.attach(servoOutput2); myservo3.attach(servoOutput3); myservo4.attach(servoOutput4);
Serial.begin(9600); // set up serial communication at 9600bps
}
void loop() {
leftPressed = digitalRead(leftButton); // gives a value to the variables as the state of the switch rightPressed = digitalRead(rightButton);
if (digitalRead(switchPin) == HIGH){ Serial.print ("Button press count = "); // out to serial buttonPresses++; Serial.println(buttonPresses, DEC); delay(250); }
if (buttonPresses == 1){
delay(30); digitalWrite(ledPin1, HIGH); digitalWrite(ledPin2, LOW); digitalWrite(ledPin3, LOW); digitalWrite(ledPin4, LOW);
if(leftPressed){
if(pos1 < minDeg){ pos1 = minDeg; delay(30); myservo1.write(pos1); // tells the servo to go to the position stored in the variable ‘pos’ Serial.print ("Servo position: "); Serial.println(pos1,DEC); }
if(pos1 < maxDeg){ pos1 -= movement; delay(30); myservo1.write(pos1); // tells the servo to go to the position stored in the variable ‘pos’ Serial.print ("Servo position: "); Serial.println(pos1,DEC); }
}
if(rightPressed){
if(pos1 > maxDeg){ pos1 = maxDeg; delay(30); myservo1.write(pos1); // tells the servo to go to the position stored in the variable ‘pos’ Serial.print ("Servo position: "); Serial.println(pos1,DEC); }
if(pos1 > minDeg){ pos1 += movement; delay(30); myservo1.write(pos1); // tells the servo to go to the position stored in the variable ‘pos’ Serial.print ("Servo position: "); Serial.println(pos1,DEC); } } }
if (buttonPresses == 2){ digitalWrite(ledPin1, LOW); digitalWrite(ledPin2, HIGH); digitalWrite(ledPin3, LOW); digitalWrite(ledPin4, LOW);
if(leftPressed){
if(pos2 < minDeg){ pos2 = minDeg; delay(30); myservo2.write(pos2); // tells the servo to go to the position stored in the variable ‘pos’ Serial.print ("Servo position: "); Serial.println(pos2,DEC); }
if(pos2 < maxDeg){ pos2 -= movement; delay(30); myservo2.write(pos2); // tells the servo to go to the position stored in the variable ‘pos’ Serial.print ("Servo position: "); Serial.println(pos2,DEC); }
}
if(rightPressed){
if(pos2 > maxDeg){ pos2 = maxDeg; delay(30); myservo2.write(pos2); // tells the servo to go to the position stored in the variable ‘pos’ Serial.print ("Servo position: "); Serial.println(pos2,DEC); }
if(pos2 > minDeg){ pos2 += movement; delay(30); myservo2.write(pos2); // tells the servo to go to the position stored in the variable ‘pos’ Serial.print ("Servo position: "); Serial.println(pos1,DEC); } } } if (buttonPresses == 3){ digitalWrite(ledPin1, LOW); digitalWrite(ledPin2, LOW); digitalWrite(ledPin3, HIGH); digitalWrite(ledPin4, LOW);
if(leftPressed){
if(pos3 < maxDeg){ pos3 += movement; delay(30); myservo3.write(pos3); Serial.print ("Servo position: "); Serial.println(pos3,DEC); } }
if(rightPressed){
if(pos3 > minDeg){ pos3 -= movement; delay(30); myservo3.write(pos3); Serial.print ("Servo position: "); Serial.println(pos3,DEC); } } }
if (buttonPresses == 4){ digitalWrite(ledPin1, LOW); digitalWrite(ledPin2, LOW); digitalWrite(ledPin3, LOW); digitalWrite(ledPin4, HIGH);
if(leftPressed){
if(pos4 < maxDeg){ pos4 += movement; delay(30); myservo4.write(pos4); Serial.print ("Servo position: "); Serial.println(pos4,DEC); } }
if(rightPressed){
if(pos4 > minDeg){ pos4 -= movement; delay(30); myservo4.write(pos4); Serial.print ("Servo position: "); Serial.println(pos4,DEC); } } }
if (buttonPresses == 5) { buttonPresses = 1; }
if (lastPressCount != buttonPresses){ // only do output if the count has changed
Serial.print ("Servo Selected = "); // out to serial Serial.println(buttonPresses, DEC); Serial.print ("Servo1 position: "); Serial.println(pos1,DEC); Serial.print ("Servo2 position: "); Serial.println(pos2,DEC); Serial.print ("Servo3 position: "); Serial.println(pos3,DEC); Serial.print ("Servo4 position: "); Serial.println(pos4,DEC); lastPressCount = buttonPresses; }
}
|
#include <Servo.h> Servo servo[4]; const byte servoPin[4] = {2,3,4,5}; void setup() { for(int i=0;i<4;i++){ servo[i].attach(servoPin[i]); servo[i].write(90); } delay(1000); } void loop() { int angle1 = map(analogRead(A0),0,1023,0,180); int angle2 = map(analogRead(A1),0,1023,0,180); int angle3 = map(analogRead(A2),0,1023,0,180); int angle4 = map(analogRead(A3),0,1023,0,180); servo[0].write(angle1); servo[1].write(angle2); servo[2].write(angle3); servo[3].write(angle4); delay(100); }
#include <Servo.h>
Servo myservo[4]; // 서보모터 변수를 담을 4개의 배열공간 만들기 [0] [1] [2] [3]
const int servoPin[4] = {5, 6, 8, 9}; // 서보모터 입력신호 받을 아두이노 핀번호 지정
const int switchPin = 4; // 스위치 입력신호 받을 아두이노 핀번호 지정
int switchValue;
int buttonPresses = 0; // 스위치버튼 누른 횟수지정
// 저항 조정기는 아날로그 0 에 지정 A0
const int ledPin[4] = {9, 10, 11, 12}; // 서보모터 입력신호 받을 아두이노 핀번호 지정 [0] [1] [2] [3]
void setup()
{
Serial.begin(9600);
for (int i = 0; i < 4; i++) { // [0] [1] [2] [3]
myservo[i].attach(servoPin[i]); // 모터 지정 =>> servoPin[i] 0,1,2,3으로는 오류발생, 5,6,8,9로 해야됨. 그러므로 for문은 잘못됨
myservo[i].write(90); // 모터 각 90도로 설정
digitalWrite(ledPin[i], LOW); // led 끔
}
myservo[0].attach(servoPin[5]); // 모터 지정 =>> servoPin[i] 0,1,2,3으로는 오류발생, 5,6,8,9로 해야됨. 그러므로 for문은 잘못됨
myservo[0].write(90); // 모터 각 90도로 설정
digitalWrite(ledPin[9], LOW); // led 끔
delay(1000);
}
void SelectSwitch(int a) {
Serial.print ("스위치핀=");
Serial.print (switchPin);
Serial.print (" / 스위치값=");
Serial.print (switchValue);
switchValue = digitalRead(switchPin); // 스위치핀의 값을 읽어와 switchValue 변수에 넣는다.
delay(1000);
if (switchValue == 1) {
Serial.print ("모터위치 = ");
Serial.print (switchValue);
Serial.print ("버튼값 = ");
Serial.println(buttonPresses, DEC);
buttonPresses++;
} // if (digitalRead(switchPin) == HIGH) {
if (buttonPresses == 4) {
buttonPresses = 0;
}
if (a == 0) {
digitalWrite(ledPin[3], LOW); // buttonPresses값이 0 이면 [3] 변수의 LED 끔
}
else {
digitalWrite(ledPin[a - 1], LOW); // 이전 LED 끔
}
digitalWrite(ledPin[a], HIGH); // 선택 led 켬
int angle = map(analogRead(A0), 0, 1023, 0, 180);
Serial.print ("저항값 = "); // out to serial
Serial.print(angle, DEC);
myservo[a].write(angle);
}
void loop()
{
SelectSwitch(buttonPresses); // 스위치 버튼을 누른 횟수를 변수로 사용하여 SelectSwitch 함수를 호출하여 처리한다.
delay(100);
}
댓글 3
-
nanumi
2018.11.08 22:16
-
nanumi
2018.11.08 23:41
#include <Servo.h> //서보 라이브러리를 불러옵니다.
const int potentiometerPin1 = 0;//가변저항기에 연결한 아날로그 핀의 번호를 설정합니다.
const int potentiometerPin2 = 1;//가변저항기에 연결한 아날로그 핀의 번호를 설정합니다.
const int potentiometerPin3 = 2;//가변저항기에 연결한 아날로그 핀의 번호를 설정합니다.
const int potentiometerPin4 = 3;//가변저항기에 연결한 아날로그 핀의 번호를 설정합니다.
Servo servo1;
Servo servo2;
Servo servo3;
Servo servo4;
void setup() {
servo1.attach(2); // 서보를 사용하는 핀으로 디지털 핀2번을 설정합니다.
servo2.attach(3); // 서보를 사용하는 핀으로 디지털 핀2번을 설정합니다.
servo3.attach(4); // 서보를 사용하는 핀으로 디지털 핀2번을 설정합니다.
servo4.attach(5); // 서보를 사용하는 핀으로 디지털 핀2번을 설정합니다.
Serial.begin(9600);
}
void loop() {
int value1 = analogRead(potentiometerPin1); //가변저항의 값을 읽어들입니다.
int angle1 = map(value1, 0, 1023, 0, 178); //읽어 들인 값을 0에서 179까지 변환 합니다.
servo1.write(angle1); //서보의 각도를 설정합니다.
Serial.println(angle1); //각도 값 출력
delay(100); // 서보가 지정한 각도까지 움직이는 동안 대기
int value2 = analogRead(potentiometerPin2); //가변저항의 값을 읽어들입니다.
int angle2 = map(value2, 0, 1023, 0, 178); //읽어 들인 값을 0에서 179까지 변환 합니다.
servo2.write(angle2); //서보의 각도를 설정합니다.
Serial.println(angle2); //각도 값 출력
delay(100); // 서보가 지정한 각도까지 움직이는 동안 대기
int value3 = analogRead(potentiometerPin3); //가변저항의 값을 읽어들입니다.
int angle3 = map(value3, 0, 1023, 0, 178); //읽어 들인 값을 0에서 179까지 변환 합니다.
servo3.write(angle3); //서보의 각도를 설정합니다.
Serial.println(angle3); //각도 값 출력
delay(100); // 서보가 지정한 각도까지 움직이는 동안 대기
int value4 = analogRead(potentiometerPin4); //가변저항의 값을 읽어들입니다.
int angle4 = map(value4, 0, 1023, 0, 178); //읽어 들인 값을 0에서 179까지 변환 합니다.
servo4.write(angle4); //서보의 각도를 설정합니다.
Serial.println(angle4); //각도 값 출력
delay(100); // 서보가 지정한 각도까지 움직이는 동안 대기
}
이거 작동하면 하단모터 시끄러움
-
nanumi
2018.11.08 23:43
#include <Servo.h> //서보 라이브러리를 불러옵니다.
const int potentiometerPin1 = 0;//가변저항기에 연결한 아날로그 핀의 번호를 설정합니다.
//const int potentiometerPin2 = 1;//가변저항기에 연결한 아날로그 핀의 번호를 설정합니다.
//const int potentiometerPin3 = 2;//가변저항기에 연결한 아날로그 핀의 번호를 설정합니다.
//const int potentiometerPin4 = 3;//가변저항기에 연결한 아날로그 핀의 번호를 설정합니다.
Servo servo1;
Servo servo2;
Servo servo3;
Servo servo4;
void setup() {
servo1.attach(2); // 서보를 사용하는 핀으로 디지털 핀2번을 설정합니다.
servo2.attach(3); // 서보를 사용하는 핀으로 디지털 핀2번을 설정합니다.
servo3.attach(4); // 서보를 사용하는 핀으로 디지털 핀2번을 설정합니다.
servo4.attach(5); // 서보를 사용하는 핀으로 디지털 핀2번을 설정합니다.
Serial.begin(9600);
}
void loop() {
int value1 = analogRead(potentiometerPin1); //가변저항의 값을 읽어들입니다.
int angle1 = map(value1, 0, 1023, 0, 150); //읽어 들인 값을 0에서 179까지 변환 합니다.
servo1.write(angle1); //서보의 각도를 설정합니다.
Serial.println(angle1); //각도 값 출력
delay(100); // 서보가 지정한 각도까지 움직이는 동안 대기
}
이것도 마찬가지 하단모터 시끄러움
왜 모터 한개일때는 괜찮은데 여러개를 설정하면 시끄러울까?
| 번호 | 제목 | 글쓴이 | 날짜 | 조회 수 |
|---|---|---|---|---|
| 공지 | 계획 | Progress | 2015.07.02 | 164851 |
| 4 |
아두이노 로봇 팔 레코드 & 플레이 소스
| nanumi | 2018.11.11 | 168923 |
| 3 |
고추말뚝박기 망치
| nanumi | 2019.04.30 | 181277 |
| 2 |
아두이노 함수 및 명령어 설명
| nanumi | 2018.11.12 | 199834 |
| 1 |
fritzing 응답없음 현상(멈춤 현상) 해결하기
| nanumi | 2018.11.11 | 219231 |
#include <Servo.h> //서보 라이브러리를 불러옵니다.
const int potentiometerPin = 0;//가변저항기에 연결한 아날로그 핀의 번호를 설정합니다.
Servo servo1;
Servo servo2;
Servo servo3;
Servo servo4;
const int switchPin = 10;
int buttonPresses = 0;
int buttonState = 0; // current state of the button
int lastButtonState = 0; // previous state of the button
void setup() {
Serial.begin(9600);
Serial.println("hello arduino!");
servo1.attach(2); // 서보를 사용하는 핀으로 디지털 핀2번을 설정합니다.
servo2.attach(3); // 서보를 사용하는 핀으로 디지털 핀2번을 설정합니다.
servo3.attach(4); // 서보를 사용하는 핀으로 디지털 핀2번을 설정합니다.
servo4.attach(5); // 서보를 사용하는 핀으로 디지털 핀2번을 설정합니다.
// pinMode(switchPin, INPUT);
}
void loop() {
buttonPresses = digitalRead(switchPin);
Serial.println(buttonPresses);
if (buttonState != lastButtonState) {
if (buttonState == HIGH) {
Serial.println("on");
Serial.print ("버튼 수 = "); // out to serial
buttonPresses++;
delay(50);
Serial.println(buttonPresses, DEC);
delay(50);
}
else {
// if the current state is LOW then the button
// wend from on to off:
Serial.println("off");
delay(100);
}
}
lastButtonState = buttonState;
if (buttonPresses == 1) {
int value = analogRead(potentiometerPin); //가변저항의 값을 읽어들입니다.
int angle = map(value, 0, 1023, 0, 179); //읽어 들인 값을 0에서 179까지 변환 합니다.
servo1.write(angle); //서보의 각도를 설정합니다.
Serial.println(angle); //각도 값 출력
delay(100); // 서보가 지정한 각도까지 움직이는 동안 대기
}
if (buttonPresses == 2) {
int value = analogRead(potentiometerPin); //가변저항의 값을 읽어들입니다.
int angle = map(value, 0, 1023, 0, 179); //읽어 들인 값을 0에서 179까지 변환 합니다.
servo2.write(angle); //서보의 각도를 설정합니다.
Serial.println(angle); //각도 값 출력
delay(100); // 서보가 지정한 각도까지 움직이는 동안 대기
}
if (buttonPresses == 3) {
int value = analogRead(potentiometerPin); //가변저항의 값을 읽어들입니다.
int angle = map(value, 0, 1023, 0, 179); //읽어 들인 값을 0에서 179까지 변환 합니다.
servo3.write(angle); //서보의 각도를 설정합니다.
Serial.println(angle); //각도 값 출력
delay(100); // 서보가 지정한 각도까지 움직이는 동안 대기
}
if (buttonPresses == 4) {
int value = analogRead(potentiometerPin); //가변저항의 값을 읽어들입니다.
int angle = map(value, 0, 1023, 0, 179); //읽어 들인 값을 0에서 179까지 변환 합니다.
servo4.write(angle); //서보의 각도를 설정합니다.
Serial.println(angle); //각도 값 출력
delay(100); // 서보가 지정한 각도까지 움직이는 동안 대기
}
if (buttonPresses == 5) {
buttonPresses = 1;
}
}
스위치 선택이 안됨